 vue源码面试题
# 谈一下你对 MVVM 的理解
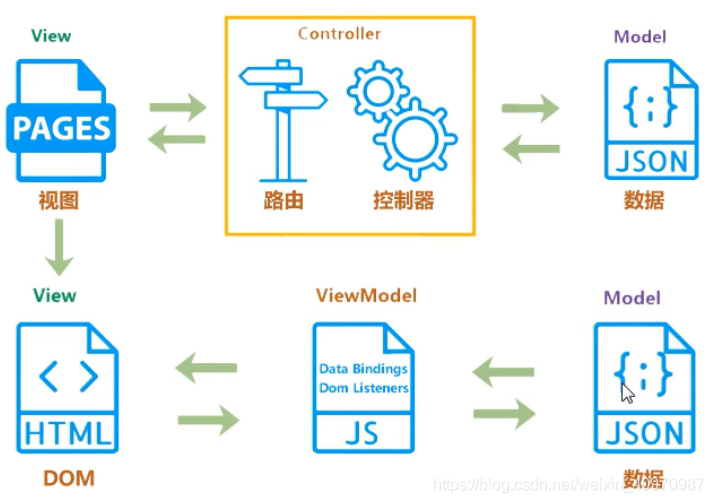
传统的 MVC 指的是,用户操作会请求服务端路由,路由拦截分发请求,调用对应的控制器来处理。控制器会获取数据,然后数据与模板结合,将结果返回给前端,页面重新渲染。 数据流是单向的,view——>model——>view MVVM:传统的前端会将数据手动渲染到页面上,MVVM 模式不需要用户手动操作 DOM 元素,将数据绑定到 viewModel 层上,会自动将数据渲染到页面中。视图变化会通知 viewModel 层更新数据,viewModel 就是 MVVM 模式的桥梁。数据驱动 数据流动时双向的,model——>viewModel<——>view
# 说一下响应式数据的理解
vue2 核心 Object.defineProperty
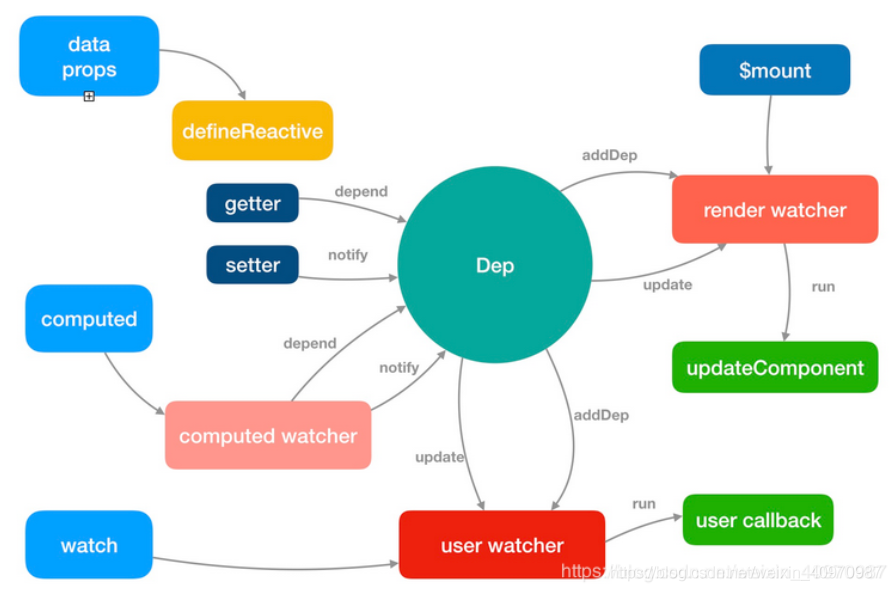
默认 Vue 在初始化数据时,会给 data 中的属性使用 Object.defineProperty,在 getter 和 setter 的进行拦截,重新定义所有属性。当页面取到对应属性时,会进行依赖收集(收集当前组件的 watcher)。如果属性发生变化会通知相关依赖进行更新操作。
依赖收集、派发更新的作用:如果没有这项操作,每个数据更新就会去渲染页面,极大的消耗性能。加了这项操作,去监听相关数据的改变,添加到队列里,当所有改变完事儿之后,一起进行渲染。
vue3 核心 proxy
解决了 vue2 中的处理对象递归、处理数组麻烦的问题
原理:
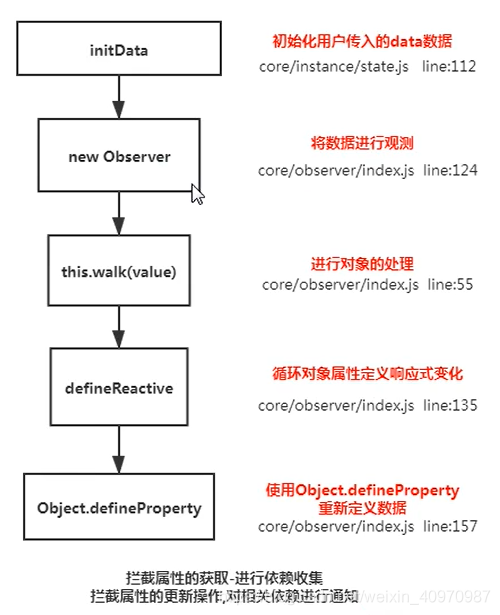
响应式数据原理
export function defineReactive(
  obj: Object,
  key: string,
  val: any,
  customSetter?: ?Function,
  shallow?: boolean
) {
  const dep = new Dep();

  const property = Object.getOwnPropertyDescriptor(obj, key);
  if (property && property.configurable === false) {
    return;
  }

  // cater for pre-defined getter/setters
  const getter = property && property.get;
  const setter = property && property.set;
  if ((!getter || setter) && arguments.length === 2) {
    val = obj[key];
  }

  let childOb = !shallow && observe(val); //递归处理子
  //每一个对象属性添加get、set方法,变为响应式对象
  Object.defineProperty(obj, key, {
    enumerable: true,
    configurable: true,
    get: function reactiveGetter() {
      const value = getter ? getter.call(obj) : val;
      if (Dep.target) {
        dep.depend(); //依赖收集
        if (childOb) {
          childOb.dep.depend();
          if (Array.isArray(value)) {
            dependArray(value);
          }
        }
      }
      return value;
    },
    set: function reactiveSetter(newVal) {
      const value = getter ? getter.call(obj) : val;
      /* eslint-disable no-self-compare */
      if (newVal === value || (newVal !== newVal && value !== value)) {
        return;
      }
      /* eslint-enable no-self-compare */
      if (process.env.NODE_ENV !== "production" && customSetter) {
        customSetter();
      }
      // #7981: for accessor properties without setter
      if (getter && !setter) return;
      if (setter) {
        setter.call(obj, newVal);
      } else {
        val = newVal;
      }
      childOb = !shallow && observe(newVal);
      dep.notify(); //派发更新
    },
  });
}
# vue 中是如何检测数组变化的
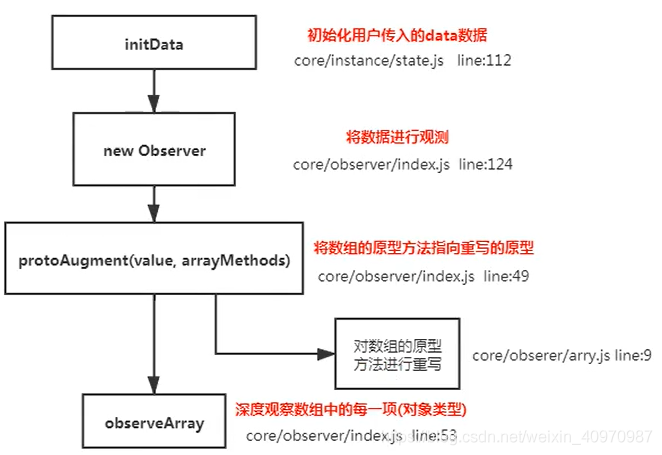
使用了函数劫持的方式,重写了数组方法,利用切片式方法进行了原型链重写
vue 酱 data 中的数组,进行了原型链重写,指向了自己定义的数组的原型方法。这样当调用数组 api 式,可以通知依赖更新。如果数组中包含着引用类型,会对数组中的引用类型再次进行监控
Object.created() 保存原有原型
/*
 * not type checking this file because flow doesn't play well with
 * dynamically accessing methods on Array prototype
 */

import { def } from "../util/index";

const arrayProto = Array.prototype;
export const arrayMethods = Object.create(arrayProto); //es6语法,相当于继承一个对象,添加的属性是在原型下

const methodsToPatch = [
  "push",
  "pop",
  "shift",
  "unshift",
  "splice",
  "sort",
  "reverse",
];

/**
 * Intercept mutating methods and emit events
 */
methodsToPatch.forEach(function(method) {
  // cache original method
  const original = arrayProto[method]; //将原生方法存下来
  def(arrayMethods, method, function mutator(...args) {
    //重写的方法
    const result = original.apply(this, args); //原生的方法
    const ob = this.__ob__;
    let inserted;
    switch (method) {
      case "push":
      case "unshift":
        inserted = args;
        break;
      case "splice":
        inserted = args.slice(2);
        break;
    }
    if (inserted) ob.observeArray(inserted); //数组中新操作的对象进行响应式处理
    // notify change
    ob.dep.notify(); //派发更新,渲染页面
    return result;
  });
});
# vue 为何采用异步渲染
vue 是组件级更新,如果不采用异步更新,那么每次更新数据都会对当前组件重新渲染。为了新能考虑,vue 会在本轮数据更新后,再去异步更新视图
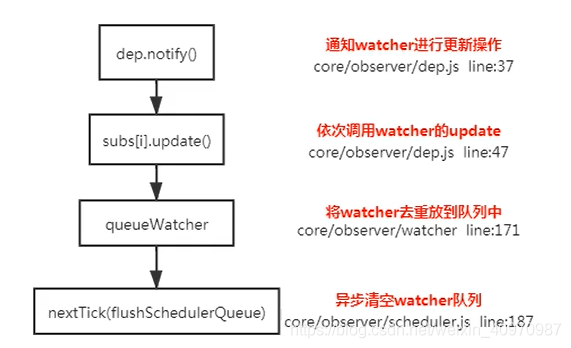
export function queueWatcher(watcher: Watcher) {
  const id = watcher.id; //判断watcher的id是否存在
  if (has[id] == null) {
    has[id] = true;
    if (!flushing) {
      queue.push(watcher);
    } else {
      // if already flushing, splice the watcher based on its id
      // if already past its id, it will be run next immediately.
      let i = queue.length - 1;
      while (i > index && queue[i].id > watcher.id) {
        i--;
      }
      queue.splice(i + 1, 0, watcher);
    }
    // queue the flush
    if (!waiting) {
      //wating默认为false
      waiting = true;

      if (process.env.NODE_ENV !== "production" && !config.async) {
        flushSchedulerQueue();
        return;
      }
      nextTick(flushSchedulerQueue); //调用nextTick方法,批量更新
    }
  }
}
# nextTick 实现原理
nextTick 主要是使用了宏任务和微任务,定义了一个异步方法。多次调用 nextTick 会将方法存入队列中,通知这个异步方法清空当前队列,所以 nextTick 就是异步方法
原理:
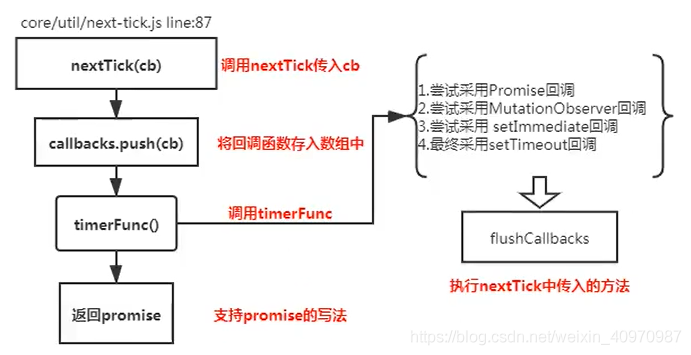
源码:
export function nextTick(cb?: Function, ctx?: Object) {
  let _resolve;
  callbacks.push(() => {
    //callbacks是一个数组
    if (cb) {
      try {
        cb.call(ctx);
      } catch (e) {
        handleError(e, ctx, "nextTick");
      }
    } else if (_resolve) {
      _resolve(ctx);
    }
  });
  if (!pending) {
    //pengding默认为false
    pending = true;
    timerFunc(); //调用异步方法
  }
  // $flow-disable-line
  if (!cb && typeof Promise !== "undefined") {
    return new Promise((resolve) => {
      _resolve = resolve;
    });
  }
}
# vue 中 computed 的特点
默认 computed 也是一个 watcher,具备缓存,只有当依赖的属性发生变化才会更新视图
原理:
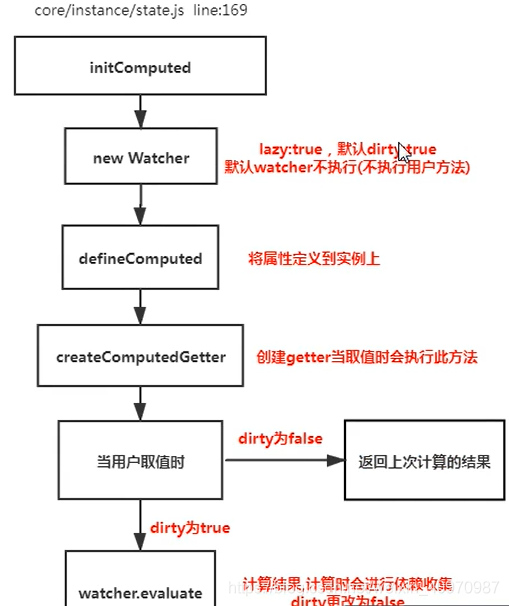
源码:
function initComputed(vm: Component, computed: Object) {
  // $flow-disable-line
  const watchers = (vm._computedWatchers = Object.create(null));
  // computed properties are just getters during SSR
  const isSSR = isServerRendering();

  for (const key in computed) {
    const userDef = computed[key]; //获取用户定义
    const getter = typeof userDef === "function" ? userDef : userDef.get;
    if (process.env.NODE_ENV !== "production" && getter == null) {
      warn(`Getter is missing for computed property "${key}".`, vm);
    }

    if (!isSSR) {
      // create internal watcher for the computed property.
      watchers[key] = new Watcher(
        vm,
        getter || noop, //将用户定义传到watcher中
        noop,
        computedWatcherOptions //lazy:true懒watcher
      );
    }

    // component-defined computed properties are already defined on the
    // component prototype. We only need to define computed properties defined
    // at instantiation here.
    if (!(key in vm)) {
      defineComputed(vm, key, userDef);
    } else if (process.env.NODE_ENV !== "production") {
      if (key in vm.$data) {
        warn(`The computed property "${key}" is already defined in data.`, vm);
      } else if (vm.$options.props && key in vm.$options.props) {
        warn(
          `The computed property "${key}" is already defined as a prop.`,
          vm
        );
      }
    }
  }
}

export function defineComputed(
  target: any,
  key: string,
  userDef: Object | Function
) {
  const shouldCache = !isServerRendering();
  if (typeof userDef === "function") {
    sharedPropertyDefinition.get = shouldCache
      ? createComputedGetter(key) //创建计算属性的getter,不是用用户传的
      : createGetterInvoker(userDef);
    sharedPropertyDefinition.set = noop;
  } else {
    sharedPropertyDefinition.get = userDef.get
      ? shouldCache && userDef.cache !== false
        ? createComputedGetter(key)
        : createGetterInvoker(userDef.get)
      : noop;
    sharedPropertyDefinition.set = userDef.set || noop;
  }
  if (
    process.env.NODE_ENV !== "production" &&
    sharedPropertyDefinition.set === noop
  ) {
    sharedPropertyDefinition.set = function() {
      warn(
        `Computed property "${key}" was assigned to but it has no setter.`,
        this
      );
    };
  }
  Object.defineProperty(target, key, sharedPropertyDefinition);
}

function createComputedGetter(key) {
  return function computedGetter() {
    //用户取值的时候会调用此方法
    const watcher = this._computedWatchers && this._computedWatchers[key];
    if (watcher) {
      if (watcher.dirty) {
        //dirty为true会去进行求值,这儿的dirty起到了缓存的作用
        watcher.evaluate();
      }
      if (Dep.target) {
        watcher.depend();
      }
      return watcher.value;
    }
  };
}
# watch 中的 deep:true 是如何实现的
内部原理就是递归,耗费性能
function initWatch (vm: Component, watch: Object) {
  for (const key in watch) {
    const handler = watch[key]
    if (Array.isArray(handler)) {
      for (let i = 0; i < handler.length; i++) {
        createWatcher(vm, key, handler[i])//每一项创建一个watcher
      }
    } else {
      createWatcher(vm, key, handler)
    }
  }
}
/**
   * Evaluate the getter, and re-collect dependencies.
   */
  get () {
    pushTarget(this)//将watcher放到全局上
    let value
    const vm = this.vm
    try {
      value = this.getter.call(vm, vm)//取值,会进行依赖收集
    } catch (e) {
      if (this.user) {
        handleError(e, vm, `getter for watcher "${this.expression}"`)
      } else {
        throw e
      }
    } finally {
      // "touch" every property so they are all tracked as
      // dependencies for deep watching
      if (this.deep) {//深度监听
        traverse(value)
      }
      popTarget()
      this.cleanupDeps()
    }
    return value
  }
  export function traverse (val: any) {
  _traverse(val, seenObjects)
  seenObjects.clear()
}

function _traverse (val: any, seen: SimpleSet) {
  let i, keys
  const isA = Array.isArray(val)
  if ((!isA && !isObject(val)) || Object.isFrozen(val) || val instanceof VNode) {
    return
  }
  if (val.__ob__) {
    const depId = val.__ob__.dep.id
    if (seen.has(depId)) {
      return
    }
    seen.add(depId)
  }
  if (isA) {//递归处理
    i = val.length
    while (i--) _traverse(val[i], seen)
  } else {
    keys = Object.keys(val)
    i = keys.length
    while (i--) _traverse(val[keys[i]], seen)
  }
}
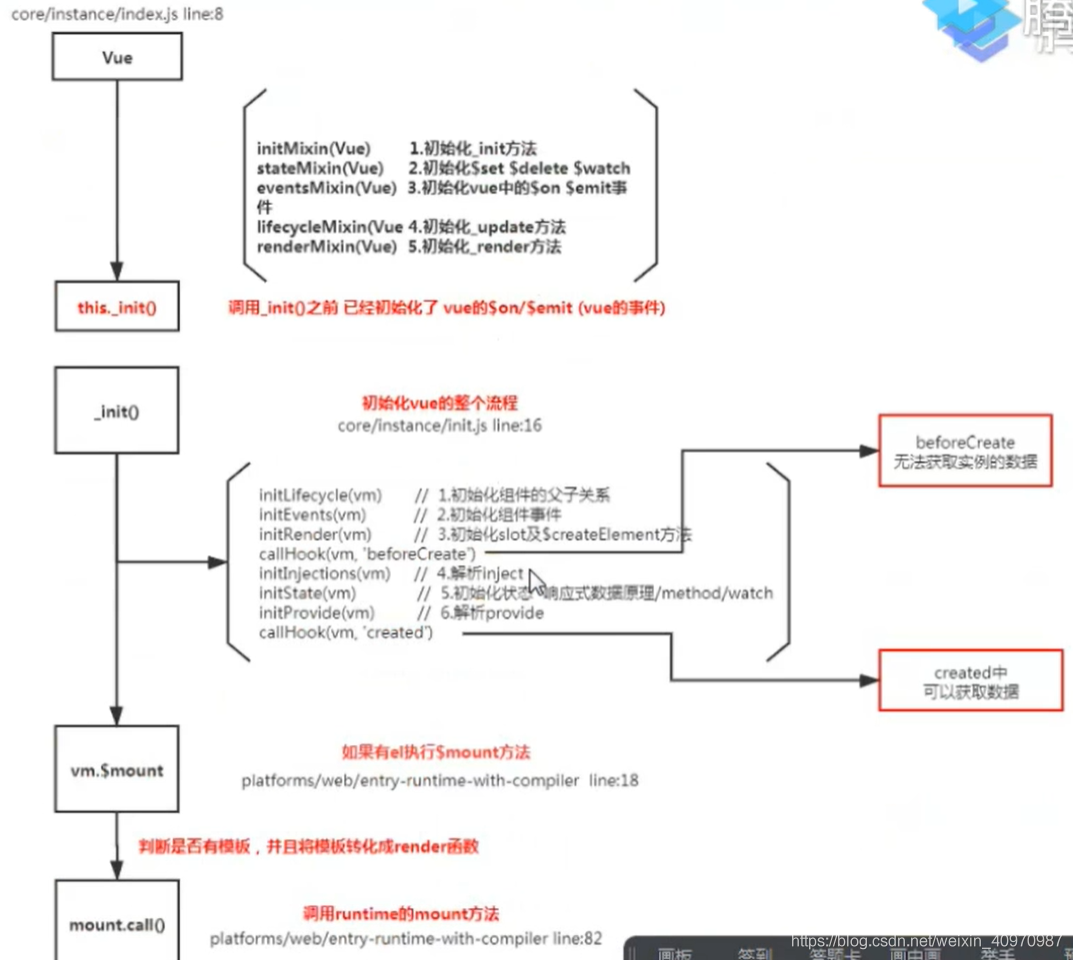
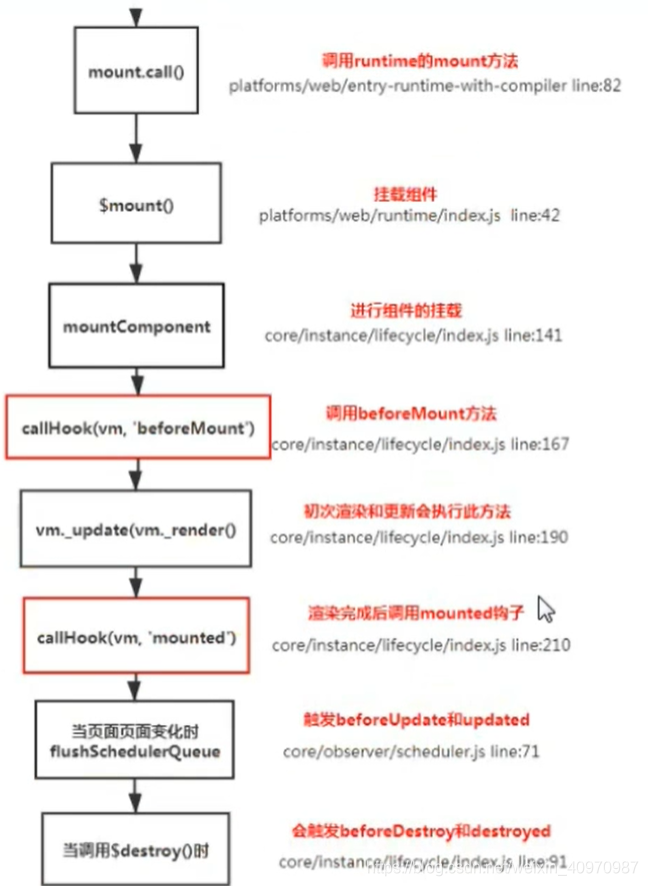
# vue 生命周期
- beforeCreate 在实例初始化 new Vue()之后,数据观测(data observer)响应式处理之前被调用
- created 实例已经创建完成之后被调用,实例已完成以下的配置:数据观测(data observer)、属性和方法的运算。watch/event 事件回调。数据可以拿到,但是没有$el。
- beforeMount 再挂开始之前被调用,相关的 render 函数首次被调用//template
- mounted el 被新创建的$el 替换,并挂载到实例上去之后被调用。页面渲染完毕
- beforeUpdate 数据更新时调用,发生在虚拟 Dom 重新渲染和打补丁之前
- updted 由于数据更改导致的虚拟 Dom 重新渲染和打补丁,在这之后会被调用该钩子
- beforeDestroy 实例销毁之前调用,在这一步,实例仍然完全可用
- destoryed Vue 实例销毁后调用。调用后,vue 实例指示的所有东西都会解除绑定,所有的事件监听都会被移除,所有的子实例也都会被销毁。该钩子在服务端渲染期间不被调用
每个生命周期内部可以做什么事
created 实例已经创建完成,因为他是最早触发的,可以进行一些数据资源的请求
mounted 实例已经挂载完成,可以进行一些 Dom 操作
beforeUpdate 可以在这个钩子中进一步更改状态,不会触发附加的冲渲染过程
updated 可以执行依赖于 Dom 的操作,尽量避免这个时候更改状态,因为可能会导致无限循环。该钩子服务器渲染期间不可用
destroyed 可以执行一些优化操作,清空定时器,解除绑定事件
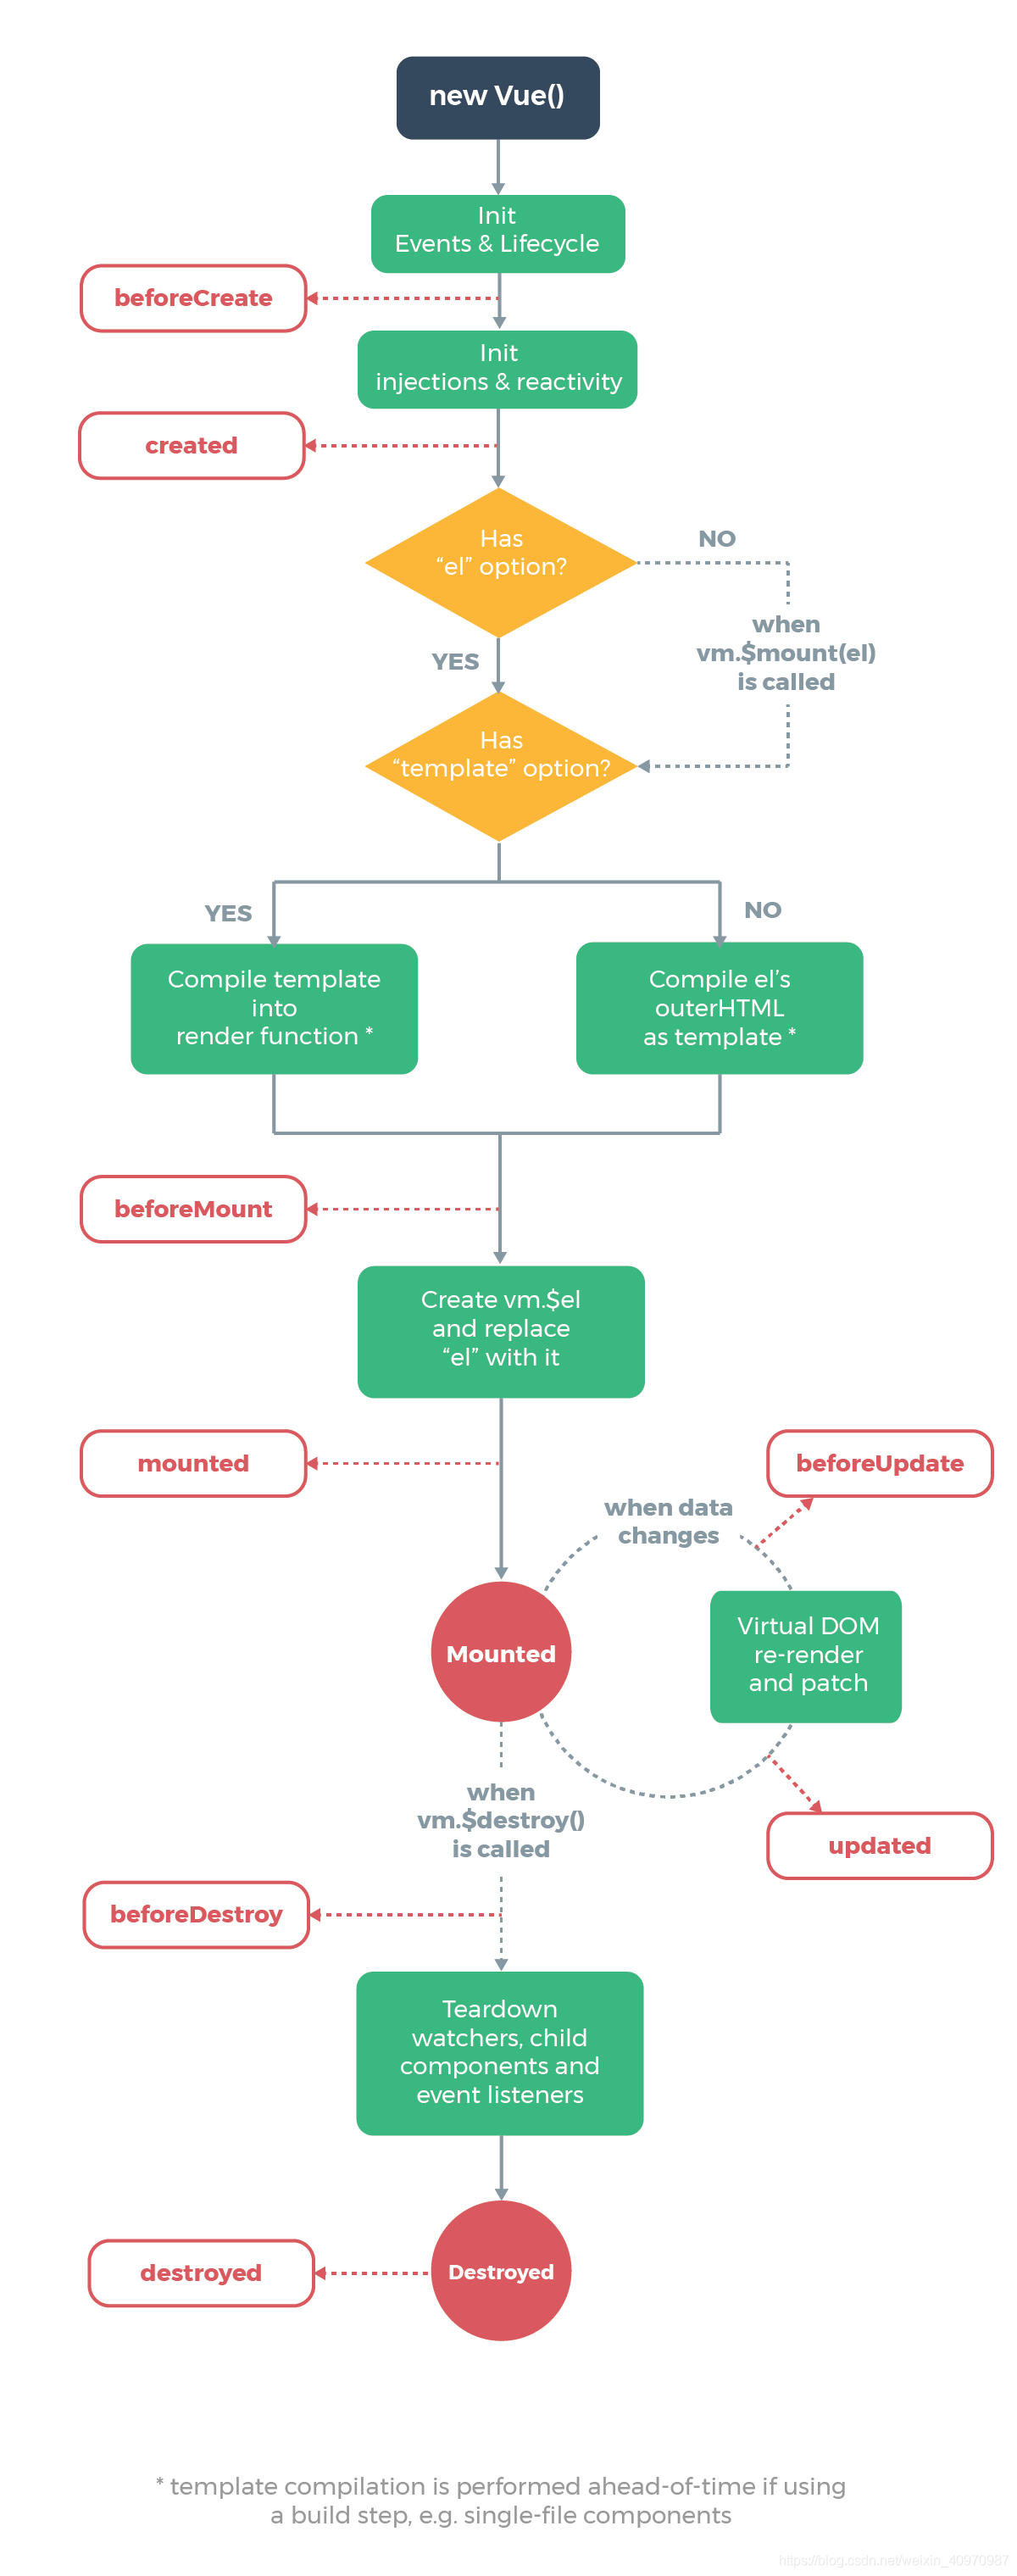
原理
# ajax 请求放在哪个生命周期中
在 created 的时候,视图中的 DOM 并没有渲染出来,此时直接去操作 DOM 节点,无法找到相关元素。 在 mounted 中,此时 DOM 已经渲染出来,可以直接操作 DOM 节点。 一般情况下都放到 mounted 中,保证逻辑的统一性,因为生命周期是同步执行的,ajax 是异步执行的。 服务器端渲染因为没有 DOM,不支持 mounted 方法,所以在服务器端渲染的情况下统一放到 created 中。
# 何时需要使用 beforeDestroy
- 可能在当前组件使用了$on 方法,需要在组件销毁前解绑
- 清除自己定义的定时器
- 解除事件的原生绑定 scroll、mousemove…
# vue 模板编译原理
template ==》 ast 抽象语法树 ==》 codegen 方法 ==》 render 函数 ==》 createElement 方法 ==》 VirtualDom 虚拟 Dom

模板结合数据,生成抽象语法树,描述 html、js 语法
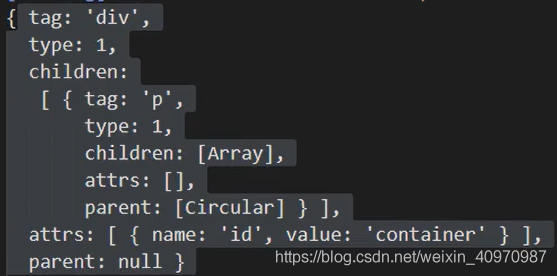
语法树生成 render 函数

render 函数

生成 Virtual Dom(虚拟 dom),描述真实的 dom 节点
渲染成真实 dom
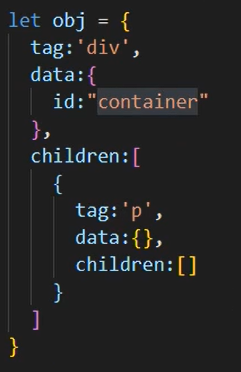
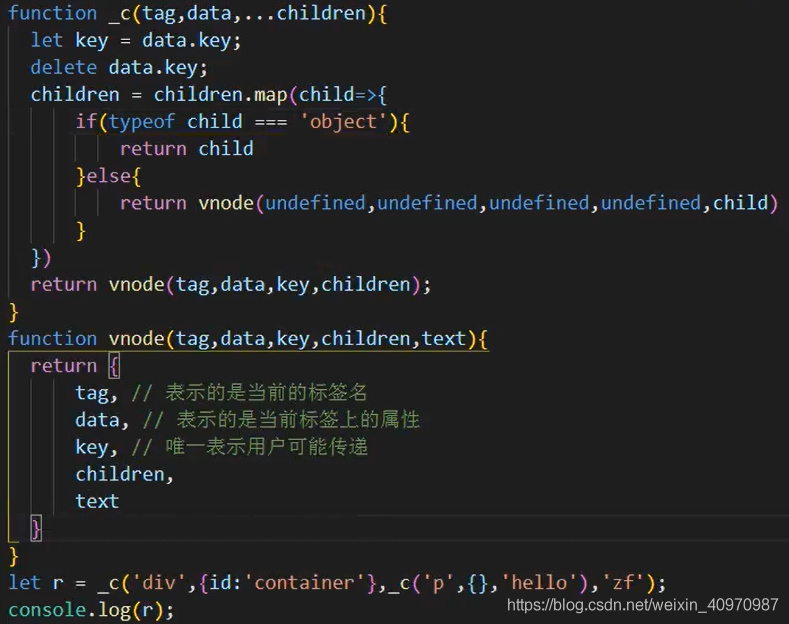
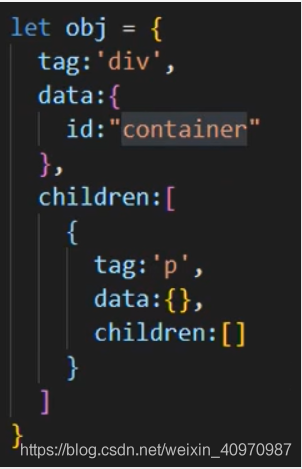
# 用 vnode 来描述一个 dom 结构
# diff 算法的时间复杂度
两个树完全 diff 算法的时间复杂度为 O(n3),Vue 进行了优化,只考虑同级不考虑跨级,将时间复杂度降为 O(n)
前端当中,很少会跨层级的移动 Dom 元素,所以 Virtual Dom 只会对同一个层级的元素进行对比
# 简述 diff 算法原理
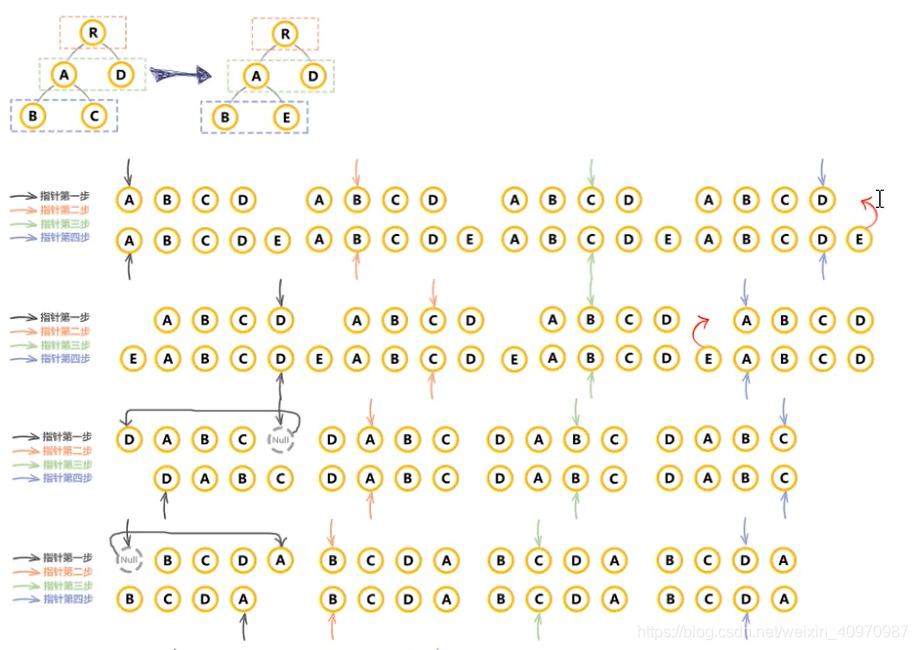
1、先同级比较,再比较儿子节点 2、先判断一方有儿子一方没儿子的情况 3、比较都有儿子的情况 4、递归比较子节点
vue3 中做了优化,只比较动态节点,略过静态节点,极大的提高了效率
双指针去确定位置
diff 算法原理图

# v-for 中为什么要用 key?
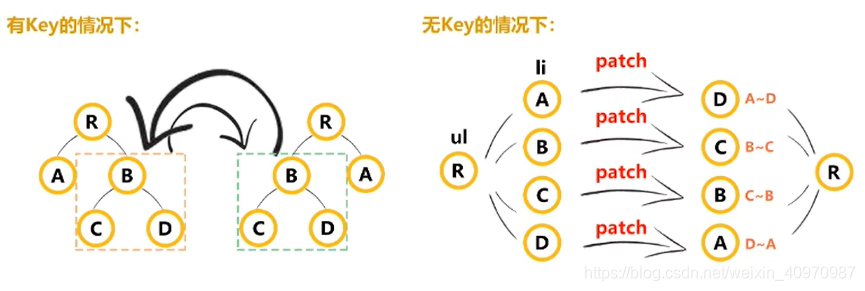
解决 vue 中 diff 算法结构相同 key 相同,内容复用的问题,通过 key(最好自定义 id,不要用索引),明确 dom 元素,防止复用
# 描述组件渲染和更新过程
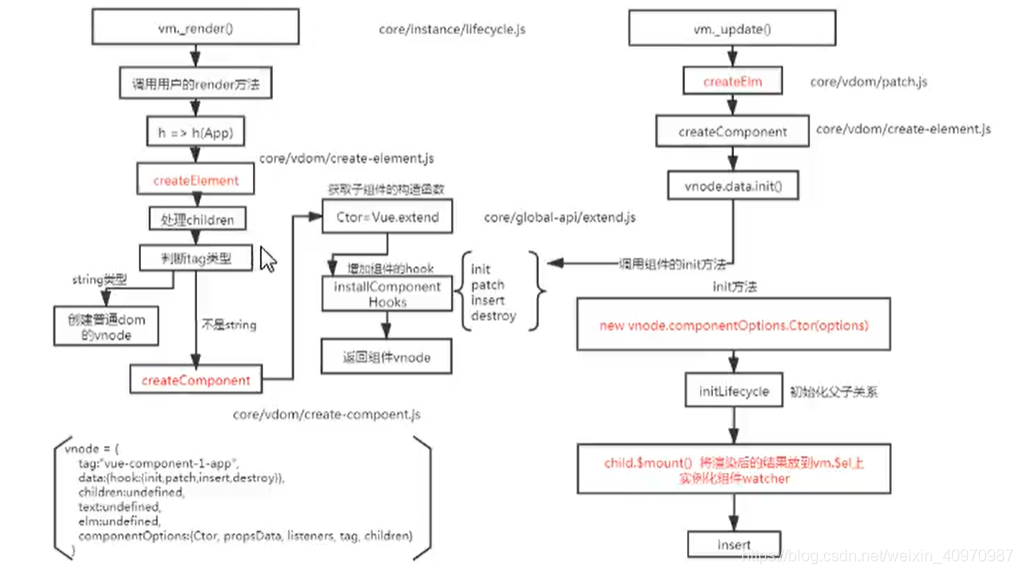
渲染组件时,会通过 Vue.extend 方法构建子组件的构造函数,并进行实例化,最终手动调用$mount 进行挂载。更新组件时会进行 patchVnode 流程,核心就是 diff 算法
# 组件中的 data 为什么是个函数?
同一个组件被复用多次,会创建多个实例。这些实例用的是同一个构造函数,如果 data 是一个对象的话,所有组件共享了同一个对象。为了保证组件的数据独立性,要求每个组件都必须通过 data 函数返回一个对象作为组件的状态
# Vue 中事件绑定的原理
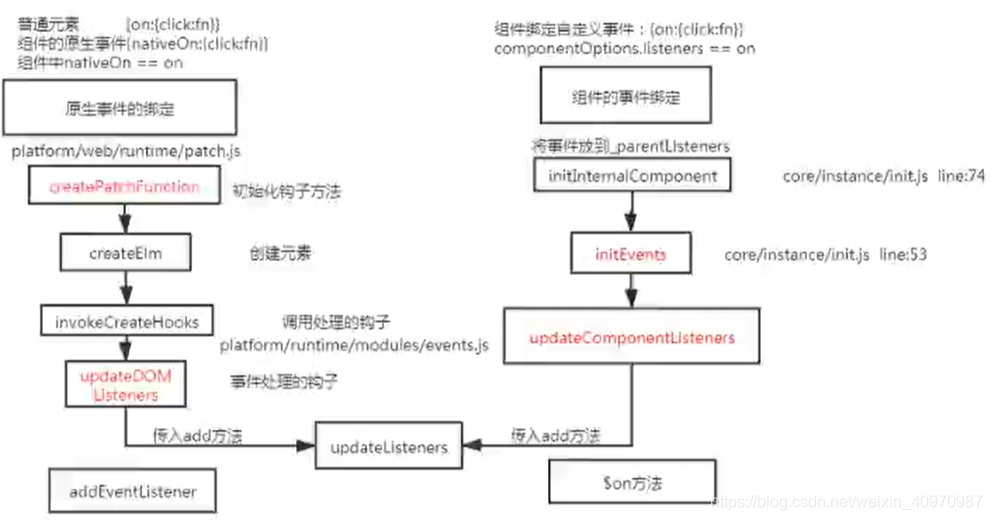
Vue 的事件绑定分为两种:一种是原生的事件绑定,一种是组件的事件绑定
原生 dom 事件绑定采用的是 addEventListener
组件的事件绑定采用的是$on 方法

# v-model 的实现原理及如何自定义 v-model?
v-model 可以看成是 value+input 方法的语法糖
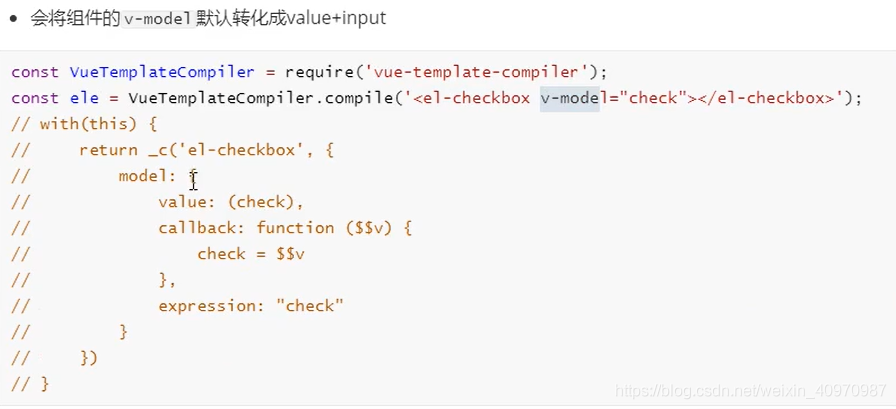
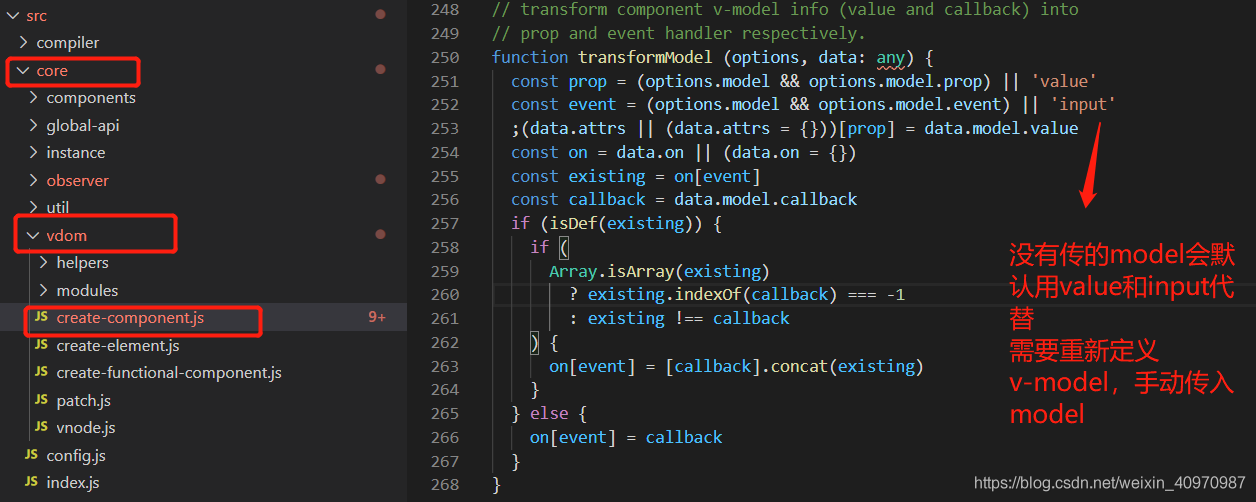
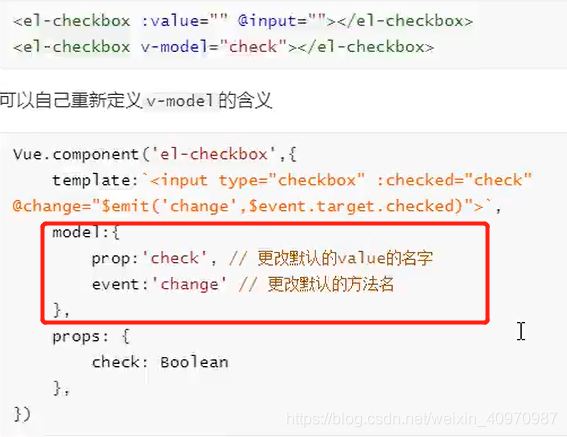
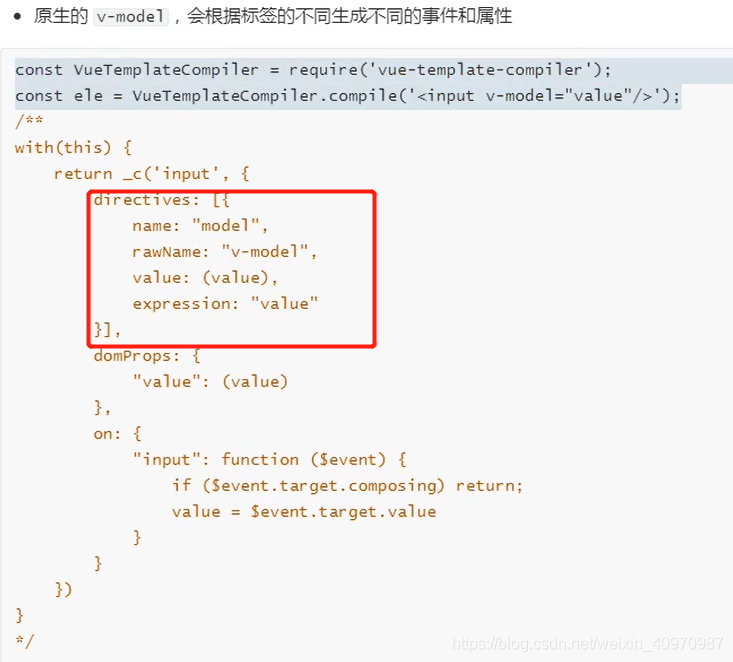
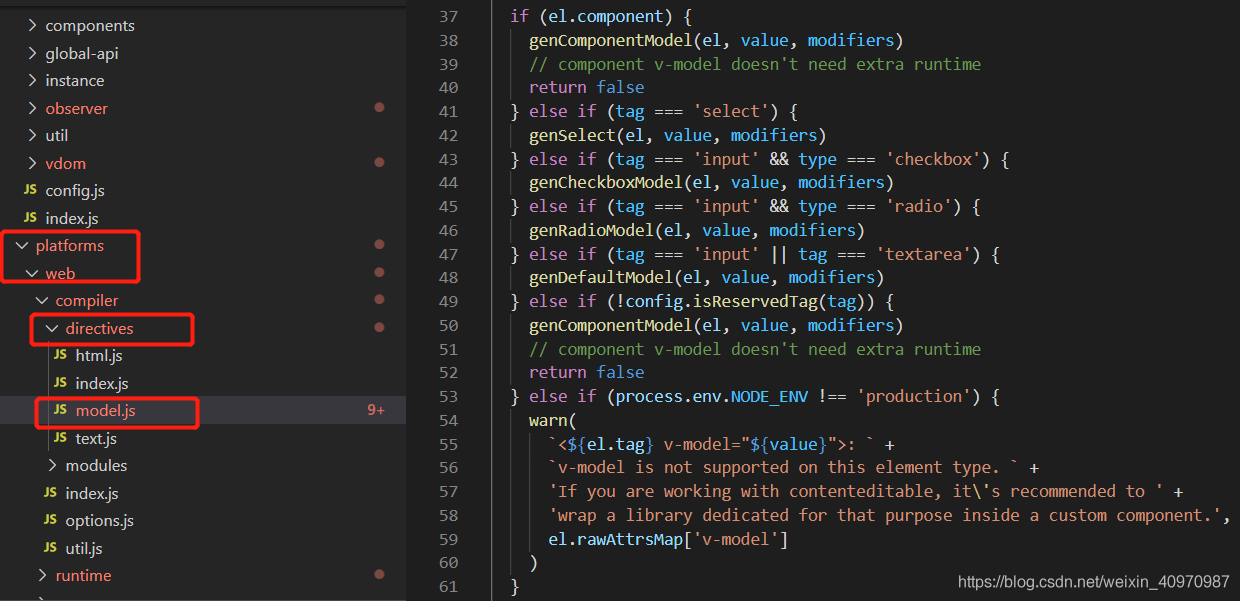
不同的标签去触发不同的方法
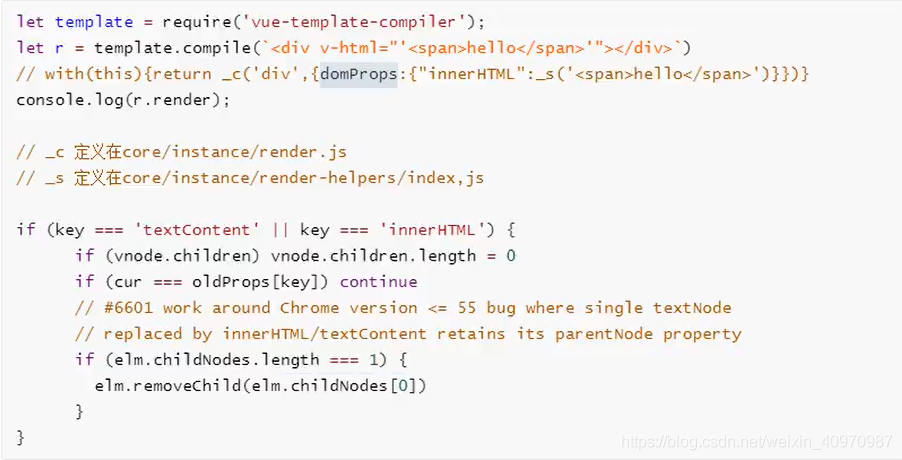
# vue 中的 v-html 会导致哪些问题
可能会导致 XXS 攻击 v-html 会替换掉标签内的子元素 原理:
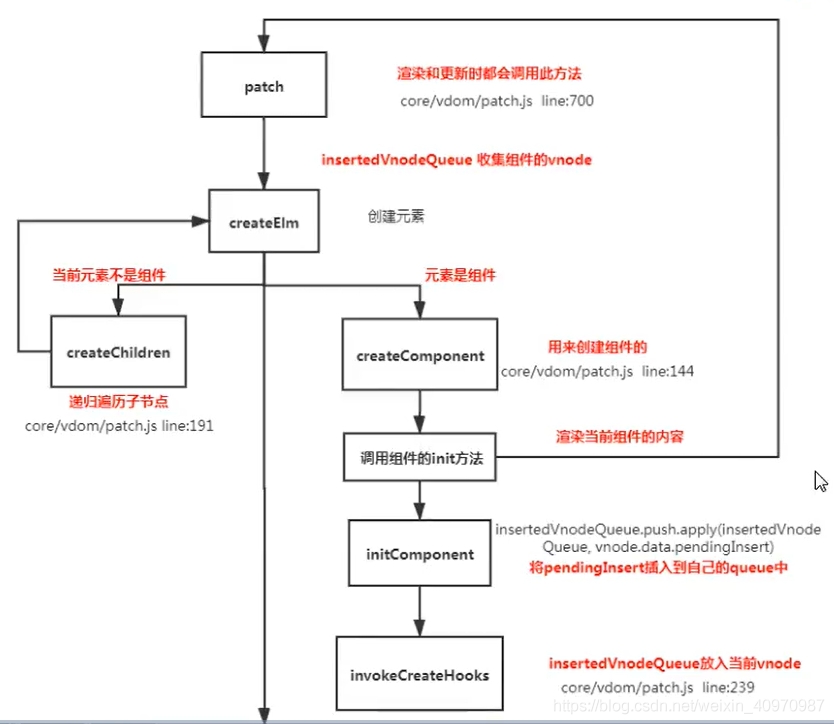
# 父子组件生命周期顺序
加载渲染过程
父 beforeCreate ==> 父 created ==> 父 beforeMount ==> 子 beforeCreat ==>子 created ==> 子 beforeMount ==> 子 mounted ==> 父 mounted
子组件更新过程
父 beforeUpdate ==> 子 beforeUpdate ==> 子 updated ==> 父 updated
父组件更新过程
父 beforeUpdate ==> 父 updated
销毁过程
父 beforeDestroy ==> 子 beforeDestroy ==> 子 destroyed ==> 父 destroyed
理解
组件的调用顺序都是先父后子,渲染完成的顺序是先子后父 组件的销毁操作是先父后子,销毁完成的顺序是先子后父
原理图
- 父子间通信 父 ==> 子通过 props ,子 ==> 父通过$on、$emit(发布订阅)
- 通过获取父子组件实例的方式$parent、$children
- 在父组件中提供数据,子组件进行消费 Provide、Inject(插件必备)
- Ref 获取实例的方式调用组件的属性和方法
- Event Bus 实现跨组件通信 Vue.prototype.$bus = new Vue,全局就可以使用$bus
- Vuex 状态管理实现通信
# vue 中相同逻辑如何抽离
Vue.mixin 用法给组件每个生命周期、函数都混入一些公共逻辑
Vue.mixin({
  beforeCreate() {}, //这儿定义的生命周期和方法会在每个组件里面拿到
});
源码
import { mergeOptions } from "../util/index";
export function initMixin(Vue: GlobalAPI) {
  Vue.mixin = function(mixin: Object) {
    this.options = mergeOptions(this.options, mixin); //将当前定义的属性合并到每个组件中
    return this;
  };
}

export function mergeOptions(
  parent: Object,
  child: Object,
  vm?: Component
): Object {
  if (process.env.NODE_ENV !== "production") {
    checkComponents(child);
  }

  if (typeof child === "function") {
    child = child.options;
  }

  normalizeProps(child, vm);
  normalizeInject(child, vm);
  normalizeDirectives(child);

  // Apply extends and mixins on the child options,
  // but only if it is a raw options object that isn't
  // the result of another mergeOptions call.
  // Only merged options has the _base property.
  if (!child._base) {
    if (child.extends) {
      //递归合并extends
      parent = mergeOptions(parent, child.extends, vm);
    }
    if (child.mixins) {
      //递归合并mixin
      for (let i = 0, l = child.mixins.length; i < l; i++) {
        parent = mergeOptions(parent, child.mixins[i], vm);
      }
    }
  }

  const options = {}; //属性及生命周期的合并
  let key;
  for (key in parent) {
    mergeField(key);
  }
  for (key in child) {
    if (!hasOwn(parent, key)) {
      mergeField(key);
    }
  }
  function mergeField(key) {
    const strat = strats[key] || defaultStrat;
    options[key] = strat(parent[key], child[key], vm, key);
  }
  return options;
}
# 为什么要使用异步组件?
如果组件功能多,打包出的结果会变大,可以采用异步组件的方式来加载组件。主要依赖 import()这个语法,可以实现文件的分割加载

# 插槽和作用域插槽
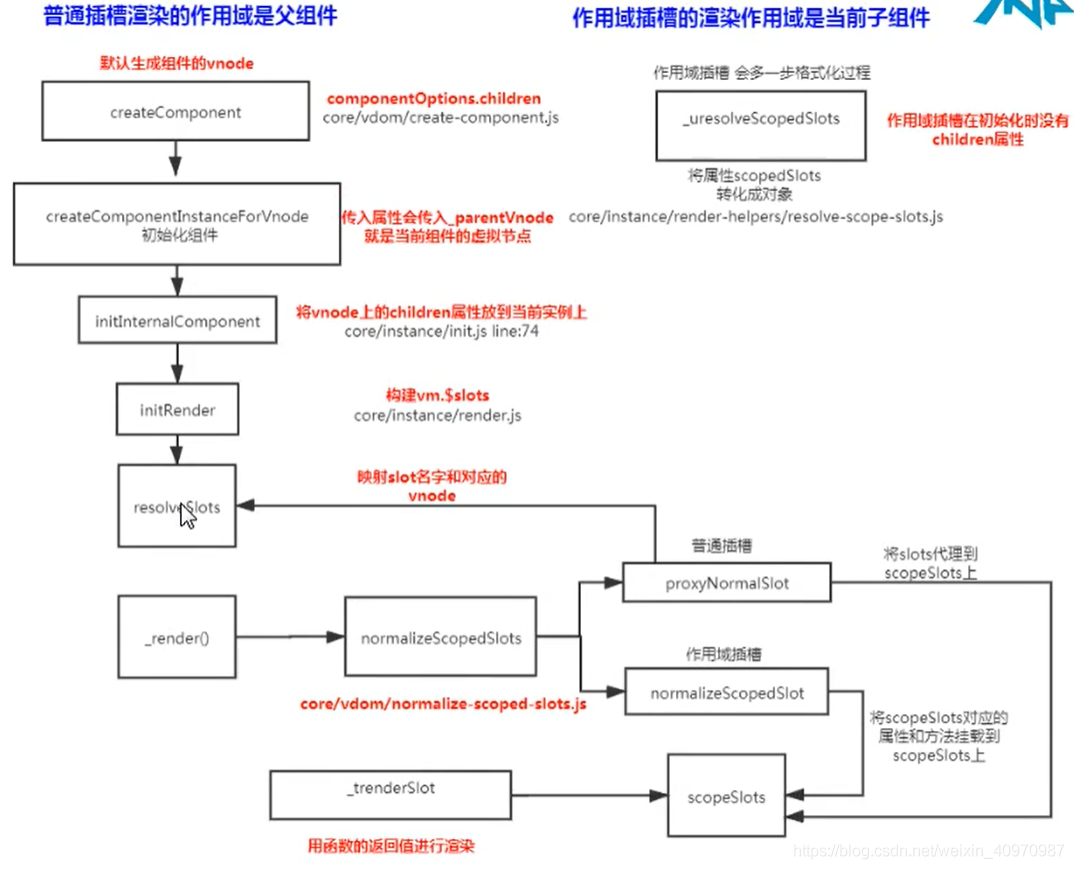
渲染的作用域不同,普通插槽是父组件,作用域插槽是子组件
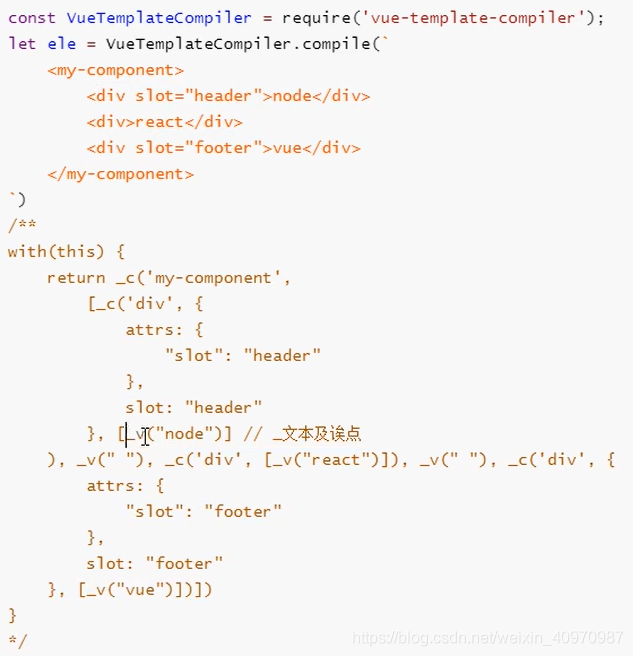
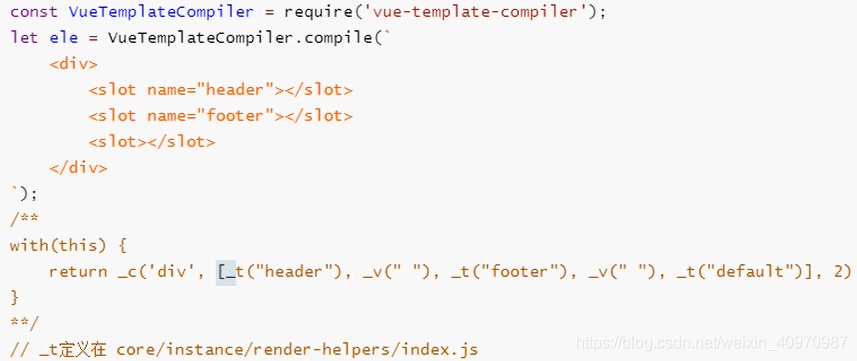
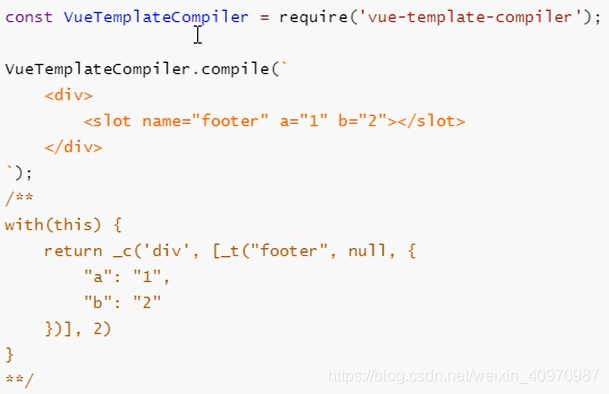
# 插槽
创建组件虚拟节点时,会将组件的儿子的虚拟节点保存起来。当初始化组件时,通过插槽属性将儿子进行分类,{a:[vnode],b:[vnode]}
渲染组件时,会拿对应的 slot 属性的节点进行替换操作。(插槽的作用域为父组件)
# 作用域插槽
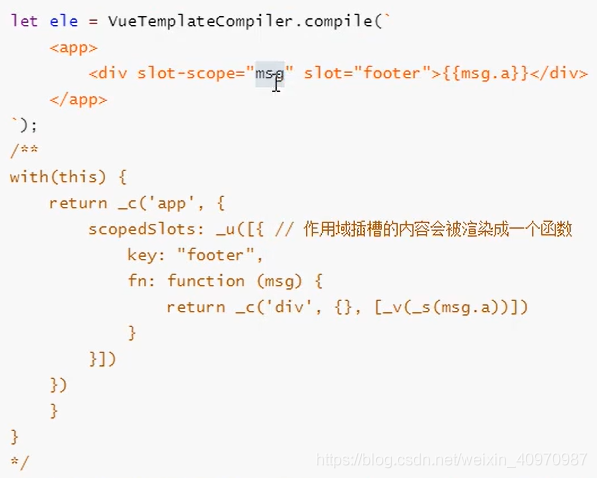
作用域插槽在解析的时候,不会作为组件的儿子节点,会解析成函数。
当子组件渲染时,调用此函数进行渲染。(插槽的作用域为父组件)
原理
# 谈谈你对 keep-alive 的理解(一个组件)
keep-alive 可以实现组件的缓存,当组件切换时,不会对当前组件卸载
常用的 2 个属性 include、exclude
常用的 2 个生命周期 activated、deactivated
源码:
export default {
  name: "keep-alive",
  abstract: true, //抽象组件

  props: {
    include: patternTypes,
    exclude: patternTypes,
    max: [String, Number],
  },

  created() {
    this.cache = Object.create(null); //创建缓存列表
    this.keys = []; //创建缓存组件的key列表
  },

  destroyed() {
    //keep-alive销毁时,会清空所有的缓存和key
    for (const key in this.cache) {
      //循环销毁
      pruneCacheEntry(this.cache, key, this.keys);
    }
  },

  mounted() {
    //会监控include和exclude属性,进行组件的缓存处理
    this.$watch("include", (val) => {
      pruneCache(this, (name) => matches(val, name));
    });
    this.$watch("exclude", (val) => {
      pruneCache(this, (name) => !matches(val, name));
    });
  },

  render() {
    const slot = this.$slots.default; //默认拿插槽
    const vnode: VNode = getFirstComponentChild(slot); //只缓存第一个组件
    const componentOptions: ?VNodeComponentOptions =
      vnode && vnode.componentOptions;
    if (componentOptions) {
      // check pattern
      const name: ?string = getComponentName(componentOptions); //取出组件的名字
      const { include, exclude } = this;
      if (
        //判断是否缓存
        // not included
        (include && (!name || !matches(include, name))) ||
        // excluded
        (exclude && name && matches(exclude, name))
      ) {
        return vnode;
      }

      const { cache, keys } = this;
      const key: ?string =
        vnode.key == null
          ? // same constructor may get registered as different local components
            // so cid alone is not enough (#3269)
            componentOptions.Ctor.cid +
            (componentOptions.tag ? `::${componentOptions.tag}` : "")
          : vnode.key; //如果组件没key,就自己通过组件的标签和key和cid拼接一个key
      if (cache[key]) {
        vnode.componentInstance = cache[key].componentInstance; //直接拿到组件实例
        // make current key freshest
        remove(keys, key); //删除当前的[b,c,d,e,a] //LRU最近最久未使用法
        keys.push(key); //将key放到后面[b,a]
      } else {
        cache[key] = vnode; //缓存vnode
        keys.push(key); //将key存入
        // prune oldest entry
        if (this.max && keys.length > parseInt(this.max)) {
          //缓存的太多,超过了max就需要删除掉
          pruneCacheEntry(cache, keys[0], keys, this._vnode); //要删除第0个,但是渲染的就是第0个
        }
      }

      vnode.data.keepAlive = true; //标准keep-alive下的组件是一个缓存组件
    }
    return vnode || (slot && slot[0]); //返回当前的虚拟节点
  },
};
# vue 中常见的性能优化
一个优秀的 Vue 团队代码规范是什么样子的? (opens new window)
# 编码优化
- 不要将所有的数据都放到 data 中,data 中的数据都会增加 getter、setter,会收集对应的 watcher
- vue 在 v-for 时给每项元素绑定事件需要用事件代理
- SPA 页面采用 keep-alive 缓存组件
- 拆分组件(提高复用性、增加代码的可维护性,减少不必要的渲染)
- v-if 当值为 false 时,内部指令不会执行,具有阻断功能。很多情况下使用 v-if 替换 v-show
- key 保证唯一性(默认 vue 会采用就地复用策略)
- Object.freeze 冻结数据
- 合理使用路由懒加载、异步组件
- 数据持久化的问题,防抖、节流
# Vue 加载性能优化
- 第三方模块按需导入(babel-plugin-component)
- 滚动到可视区域动态加载(https://tangbc.github.io/vue-virtual-scroll-list)
- 图片懒加载(https://github.com/hilongjw/vue-lazyload.git)
# 用户体验
- app-skeleton 骨架屏
- app shell app 壳
- pwa
# SEO 优化
- 预渲染插件 prerender-spa-plugin
- 服务端渲染 ssr
# 打包优化
- 使用 cdn 的方式加载第三方模块
- 多线程打包 happypack
- splitChunks 抽离公共文件
- sourceMap 生成
# 缓存压缩
- 客户端缓存、服务端缓存
- 服务端 gzip 压缩
# Vue3.0 的改进
- 采用了 TS 来编写
- 支持 composition API
- 响应式数据原理改成了 proxy
- diff 对比算法更新,只更新 vdom 绑定了动态数据的部分
# 实现 hash 路由和 history 路由
- onhashchange #
- history.pushState h5 api
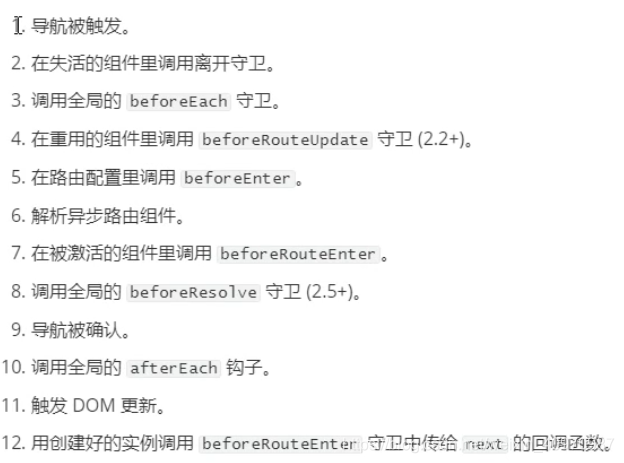
# 路由守卫解析流程
# action 和 mutation 区别
mutation 是同步更新数据(内部会进行是否为异步方式更新的数据检测)
action 异步操作,可以获取数据后调用 mutation 提交最终数据
# 像 vue-router,vuex 他们都是作为 vue 插件,请说一下他们分别都是如何在 vue 中生效的?
通过 vue 的插件系统,用 vue.mixin 混入到全局,在每个组件的生命周期的某个阶段注入组件实例
# 请你说一下 vue 的设计架构
vue2 采用的是典型的混入式架构,类似于 express 和 jquery,各部分分模块开发,再通过一个 mixin 去混入到最终暴露到全局的类上
